
Setting up Google Compute Engine
This post covers the basic steps needed to get up and running with Google Compute Engine (GCE). We’ll look
at how to start a project in the Google Cloud Platform web interface, install Google Cloud SDK, and use the
command-line utility gcloud.
We’ll also see a useful way to keep programs running in the cloud after you log out of your compute instance!

The following steps assume that you’ve never used any Google Cloud services before, and you’re starting from scratch.
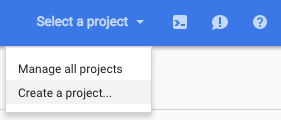
- Go to the Google Cloud Console Page. Log in with your Google account if you’re
not already logged in. Create a new project by clicking “Create a project…” under “Select a project” button in the upper right-hand corner:
- Use the web interface to create a project:
- It will be given a semi-random project ID based on the project name you choose, in this case
starlight-1194
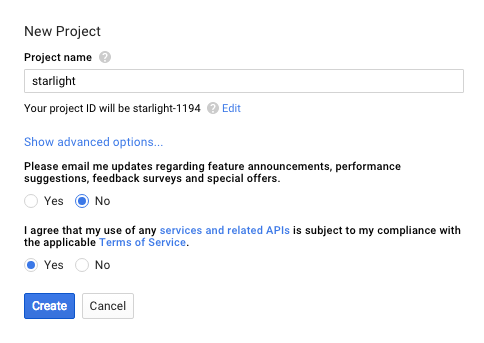
- It will be given a semi-random project ID based on the project name you choose, in this case
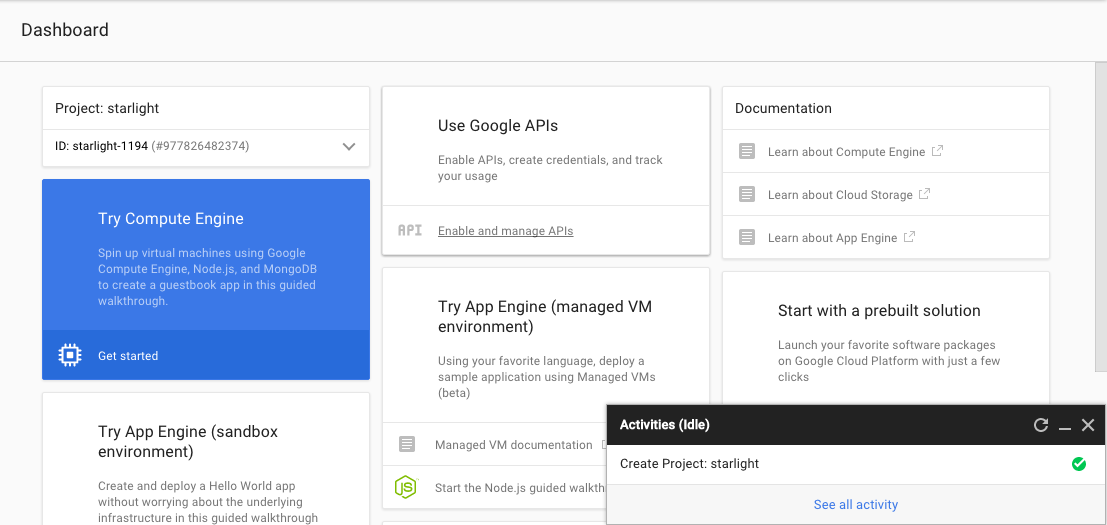
- After creating the project, you’ll get to a dashboard that looks like this. Click the big blue “Try Compute Engine” button.
- Now you have to start a free trial to use Google Compute Engine. Click on the “Sign up for a free trial” button on this page:
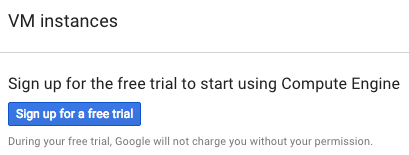
You’ll have to enter some personal information on the next page you get to.
- The free trial comes with $300 to use within 60 days. You’re more likely to run out of time than money, unless you have a specific computationally demanding problem in mind. With the $300, I was able to run four high-CPU instances (which are more expensive per hour) non-stop for about two weeks, and I had leftover money to use for several other projects within the 60 days!
- Install the Google Cloud SDK. This will also install
gcloud, which is a command-line tool that allows you to manage your Google Cloud Platform resources from the terminal.- Run
curl https://sdk.cloud.google.com | bash - Restart your shell, by running
exec -l $SHELL - Run
gcloud initto set up a default configuration. This is very easy, you can just follow the default prompts.
- Run
- Authenticate with your Google account:
gcloud auth login- This will open a tab in your browser; you have to log in to your Google account (if you’re not already logged in), and click OK when it asks for permission to access your account data.
-
Configure
gcloudwith the project ID that was automatically created:gcloud config set project starlight-1194 -
Now you can create a compute instance from the command line:
gcloud compute instances create tester-instance \ --zone us-central1-f --machine-type n1-standard-1 \ --image debian-7-backports -
And connect to the instance via SSH using:
gcloud compute ssh tester-instance --zone us-central1-a -
Now you can install software into the instance like normal, using
sudo apt-get install julia -
Copy local files (e.g. Python or Julia scripts) to the VM with:
gcloud compute copy-files script.py tester-instance:script.py
How to Keep Programs Running When You Log Out
Run a program with screen to keep it running when you log out of your SSH session:
First, you need to install screen inside your compute instance:
sudo apt-get install screen
Then, run:
screen python script.py
This will create a new screen, where the output of python script.py will be printed. The
trick here is that now you can detatch from this screen, and return to your old terminal
prompt, while the program keeps running and printing to the other screen. To detatch from
the screen, enter Ctrl-a and then d at any point.
Using this method, you can create as many screens as you want; to list all existing screens, use:
screen -ls

There is a screen on:
   20988.pts-0.tester-instance    (09/28/2015 08:52:32 PM)   (Detached)
To re-attach to an existing screen, use:
screen -r 20988.pts-0.tester-instance
If there is only one other screen, you don’t have to specify the screen ID as above:
screen -r